Queen Bee Eats for a Day

Look at My Dinner March 24, 2009

Filed under: Cooking Adventures — queenbeeeatsforaday @ 2:52 am
Tags:
look-at-my-dinner

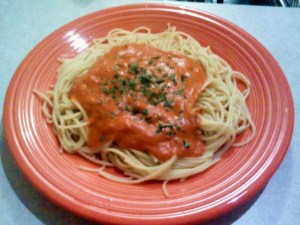
yumm?!

This image was emailed to me last week by my sister, Jennifer.  She made her own dinner, garnished it, and took a picture.  The email had the simple subject, “look at my dinner.”

I think that our blog has inspired her, which is what it’s all about – being adventurous, trying new things, and having fun with food.

Granted, this is a jar of spaghetti sauce (Vodka sauce), but the fact that she thought about(and followed through) making a meal instead of eating at Chipotle for the tenth time this week makes me think that there’s hope for her yet!

Way to go, Jen!

XOXO
QB


Economy Minded Luxe Lunch March 23, 2009

Filed under: Food Adventures,Restaurants — haleyhoneybee @ 6:21 pm
Tags: ,

In light of the current economy, we are curbing our out of the house eating. Sometimes it seems unjustified to pay beaucoup bucks for only a moderate meal. But there are times that it is enjoyable to eat out – my hubby and I love Saturday lunch dates. So we decided to adventure out for a lovely afternoon, and pay mind to our ordering.

I shall begin…but I’ll need to take a moment to close my eyes, a and salivate for a moment, mmm, the taste memory is fantastic. We went to Canaletto in Newport Beach, an Italian restaurant.  For our meal we ordered the Antipasto di Pesce, small plate samplings of their seafood appetizers. I should note that all the dishes themselves are on the lunch menu, but the sampling antipasto is actually listed on the dinner menu (we had checked out the menu online), there was no problem ordering it however. The small plates each came out one by one when ready, sized perfectly for two to share, and price accordingly. The antipasto is $15 pp, but the meal was far more luxe than the $30 price tag (for 2) would suggest. I should also mention that each of the appetizers if ordered alone are priced between $10 and $14, so to get e bit of all of them is well worth it. But none of this is giving the meal justice…let me describe the dishes that arrived…

Ostriche Fresche – Seasonal fresh oysters with lemon and cocktail sauce
Carpaccio di Spada – House-cured swordfish carpaccio with sliced fresh artichokes, capers, and micro-greens
Sardee in Saor – Fresh sardines fried and marinated with sweet and sour onions (so similar to a herring snack my hubby had a few summers ago in Amsterdam)
Baccala ‘alla Vicentina – Imported dry cod baked in milk with onions, capers and garlic, served over soft polenta (the description does nothing for the taste – more creamy than salty, warm and delectable)
Calamaretti Fritti – Baby squid lightly floured and deep-fried; served with grilled polenta and spicy marinara sauce
Polipo con Patate – Warm octopus and potato salad with extra-virgin olive oil and lemon juice (the octopus was no where near it usually chewy self, it was tender and scrumptious)

It was a leisurely late lunch, and a lot of wonderfully different food. I have no pictures, but no fear, I’ll be going back and I’ll snap some. ~ HHB


Let them eat (gluten-free) cake

Filed under: Cakes,Cooking Adventures,Recipes & How-Tos — haleyhoneybee @ 5:43 pm
Tags:

As a wedding present for a childhood friend of my hubby, we are making them some cakes to serve at their wedding. We could call them wedding cakes. And this has become a cake baking adventure for many weeks.

Strategy:img_6676

  • The betrothed have very adventurous taste buds and are non-traditional in a fabulous way.
  • Instead of just one cake, we decided to make cakes of various sizes, each with a unique cake stand/plate (most of which are vintage).
  • The Bride has gluten intolerance so care must be taken. For the wedding day only one of the cakes will be GF but for the cake tasting I baked them all GF so she could partake. (This would be a good time to mention that my Mama is allergic to all things wheat, and buckwheat, and totally Celiac…so I have a bit of practice)

The cakes that made the cut for the tasting (recipe links in progress):

  • Black pearl layer cake with ginger vanilla fresh cream frosting
  • Cranberry snow cake with white chocolate Swiss butter cream frosting
  • Lemon Curd layer cake with lemon Swiss butter cream frosting
  • Passion fruit layer cake with passion fruit Swiss butter cream frosting
  • Honey spice cake with cardamom cream frosting
  • Honey spice cake with a thick sugar glaze (made the cake twice because I wanted to try it with garbanzo flour)
  • Molten chocolate mini-cupcakes

img_6666

*Note on the alternative flours used: The first five cakes were all made with a white rice flour blend, for one of the honey cakes I used a garbanzo flour blend, and the cupcakes only call for cornstarch.

There was also a red velvet cake with a cream cheese frosting, but that one was nixed during a previous trial – after much research on classic recipes, in the end it didn’t have enough oomph.


Fettucine Alfredo – Quick and Easy

Filed under: Recipes & How-Tos — queenbeeeatsforaday @ 1:22 am
Tags:

fettucine-alfredo

It’s funny that the things you didn’t love growing up kinda grow on you as an adult.  A few years ago, I had such a craving for fettucine alfredo and decided to learn how to make it.  Looking back at my years at home, my mom would make this dish and I would dread it.  Today, while it’s still not my favorite Italian dish, it ranks quite high.

It’s super simple to make and chances are, you already have everything you need in the pantry and fridge.  It is the perfect dish to make when you don’t feel like cooking but you also don’t feel like any take out.  Give it a shot!  You’ll be ready to eat in less than a half hour.

adding-cheese

The Ingredients:

  • 1 pound dried fettuccine
  • 6 tablespoons unsalted butter
  • 1 shallot, minced
  • 1 cup heavy cream
  • 1 cup finely grated Parmigiano-Reggiano
  • 1/2 teaspoon salt
  • 1/4 teaspoon freshly ground black pepper
  • A pinch of nutmeg, optional
  • Fresh parsley, for garnish, optional

before-tossThe Directions:

1. Bring a large pot of salted water to a rapid boil. Cook the fettuccine until al dente. When the pasta is done cooking, drain it and reserve 1/4 cup of the pasta cooking liquid.

2. As the pasta cooks, melt the butter in a medium saucepan over medium-high heat. When the butter is melted, add the shallots and sauté until tender.

3. Add the heavy cream and bring the mixture to a boil. Add the nutmeg here if you choose to.

4. Cook the cream mixture, stirring occasionally, until sauce has reduced slightly, about 5 minutes. Remove from the heat.

5. Put the pasta, along with the reserved cooking liquid, back into the pot it was cooked in. Heat this over medium-high heat.

6. Add the butter-cream mixture to the pasta and half of the grated Parmesan-Reggiano. Toss to coat. Season with salt and pepper.

7. Sprinkle with remaining Parmesan-Reggiano and garnish with parsley.

Serve immediately. This recipe yields about 4 to 6 servings.

XOXO
QB


The Perfect St. Patrick’s Day Meal March 17, 2009

Happy St. Patrick’s Day, everyone!  Hope you’re wearing lots of GREEN!

the-table


Two weeks ago, my sweetie and I were in Gainesville partly for business and partly for pleasure.  I had scheduled a work trip to coincide with the same week of the Morrissey concert in Jacksonville for which we had tickets.  (The show was cancelled.)

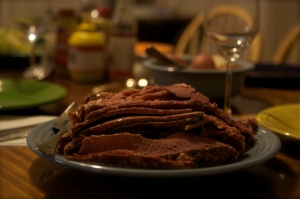
corned-beef


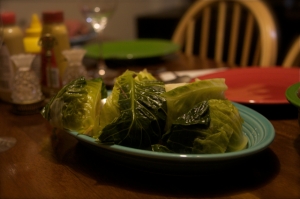
As serendipity would have it, the other bee, Melissa, was also in town for work and my sister, Jennifer, was free, so what better way to celebrate our meshing schedules than to invite ourselves over to Donald and Erica’s for an early St. Patrick’s Day meal – Corned Beef, Cabbage, and Potatoes.

cabbage


We paired dinner with some Trader Joe’s Shiraz (surprisingly good) and a couple of beers.


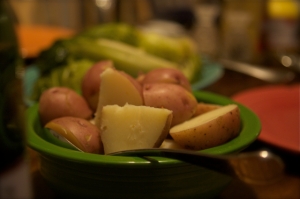
potatoes


Melissa provided a quick, simple, and lovely conclusion to the meal in a dessert of fresh strawberries and cannoli accompanied by some really terrific Sweetwater (locally roasted & organic) decaf coffee Donald brewed.


dessert

It was a fun night filled with lots of food and friends.  I think we all had a really great time and can’t wait to do it again!

Here’s the Recipe –

New England Boiled Dinner

Ingredients –

4-5 pound corned beef brisket
1 head green cabbage, cut into wedges

8 red skin potatoes, halved
2-3 tbsp dried pickling spices

Directions –

  1. Place the corned beef in a large pot and fill with cold water.  Add the pickling spices to the pot – sometimes the corned beef will come with a packet of spices but it’s usually not very much.  Let the beef simmer for 3 hours.
  2. Next, add the potatoes to the same pot and let simmer for 10 minutes.
  3. Add the cabbage and let simmer until the cabbage and the potatoes are fork tender.
  4. Finally remove the vegetables and the corned beef from the pot.  Thinly slice the corned beef perpendicular to the grain of the meat. Serve with a variety of mustards or horseradish sauces.

Everything was really delicious and cooked to perfection!  After seeing how it was done, it seems like a super easy way to make a lot of food for a hungry crowd!  Thanks again, Erica and Donald!

XOXO
QB


Tuesday must be the new burger night! March 11, 2009

Filed under: Recipes & How-Tos — haleyhoneybee @ 11:52 pm
Tags: , ,
Tuesday night had something in the air…maybe the smell of burgers. And when I checked my email on Wednesday morning there was a note from Rica about their mouth watering BIG burgers. My hubby and I had also made burgers Tuesday night – although ours were considerably different, and meatless. I thought the irony of the burgers deserved attention.
Try them out and see which is your preference.
xoxo,
HHB

Burger #1, Black Bean with pineapple salad. I must admit, sometimes I’m just not in the mood for eat. And I am always up for a veggie-only night, but these burgers were a far cry from a girly California veggie burger – yes we are in Cali but they can fill up a manly appetite – take my hubby’s word for it. My uber-fav part was the pineapple salad to accompany – YUM, the perfect side.

img_6637

Black bean Burgers with Pineapple Salad

(adapted from Gourmet Magazine Feb 2009)
1 (14-ounce) cans black beans, rinsed and drained
1 (14-ounce) cans refried beans (I used the 365 brand)
3 tablespoons mayonnaise
1/3 cup panko flakes
2 teaspoons ground cumin
1 teaspoon dried oregano, crumbled
1/4 teaspoon cayenne
1/4 cup finely chopped cilantro
3 tablespoons vegetable oil
4 whole grain buns
1 (3-pound) pineapple, peeled and diced
1/2 pound jicama, peeled and cut into 1/4-inch pieces
1 (7-to 8-ounce) avocado, cut into cubes
1 small red onion, thinly sliced (1/2 cup)
2 tablespoons olive oil
1 tablespoon apple cider vinegar

Mix first 8 ingredients together. Form mixture into 4 patties. Heat oil in a 12-inch heavy skillet over medium-high heat until it shimmers. Cook burgers until outsides are crisp and lightly browned, turning once, about 5 minutes total. Serve on buns. (my hubby liked his with some melted cheddar and sour cream). For the salad toss together the last 6 ingredients with 3/4 teaspoon salt and 1/2 teaspoon pepper. If jicama isn’t easily found you could also use radishes.

~~~~~

Burger #2, Email from Rica:

Last night we [Rica & Don] decided to make burgers & fries for dinner.  I thought this would be just the usual burger…but it wasn’t…it was better than usual.  Now, this is either because of my extreme hunger or Don’s talent!  Here’s the recipe:

donsbigkahunaburger

Don’s Big Kahuna Burger

1 lb       97% lean ground beef
1/2       medium onion, grated
1/2 c    shredded colby jack cheese
1 tbsp   A1 steak sauce
1/4 tsp  fresh cracked pepper
1 tsp     kosher salt
1/8 tsp  crushed red pepper flakes
1 tsp     cajun seasoning
4          Of your favorite hamburger buns

Combine all of the ingredients, including the shredded cheese, in a bowl. Mix with hands until combined. Form 4 patties. Grill the burgers to desired doneness. Serve the burgers on toasted buns and top with your favorite burger toppings!

Enjoy!
 

Making Homemade Banana Bread March 1, 2009

Filed under: Recipes & How-Tos — queenbeeeatsforaday @ 9:18 pm
Tags:

banana-bread-2

Nothing is more rewarding or comforting than a thick slick of warm banana bread fresh from the oven.  It is the ideal breakfast slice or a relaxing afternoon snack with a cup of hot tea. For me, it reminds me of my mom’s kitchen as she made quite a few loaves of this when I was growing up.

While you may think that baking homemade banana bread is a difficult task, it is one of the easiest quick breads to make – probably because instead of yeast to leaven the dough, baking soda is used.  Because there is no yeast, there is no lengthy period waiting for it to ferment or the dough to rise.

All homemade banana bread takes is an appetite, a few overripe bananas, and a few minutes.

There really is nothing to this recipe and the longest part of it is the actual baking time (about an hour).  If you have a well-stocked cupboard then you probably already have all the required ingredients, as they are all staples.

I tend to make banana bread more often than any other type of baked good, simply because we usually don’t eat all of the bananas in the fruit bowl before they become too ripe.

I also usually leave out the nuts, as my sweetie just isn’t a fan of them in the loaf.

The Ingredients:

1 3/4 cups all-purpose flour
2/3 cup granulated sugar
2 teaspoons baking powder
1/2 teaspoon salt
1 cup mashed ripe banana (about 3 medium bananas)
1/3 cup butter or margarine, room temperature
2 tablespoons milk
2 eggs
1/4 cup chopped nuts (optional)

The Steps:

Preheat the oven to 350°.

Combine 1 cup of the flour (keep the rest for later), the sugar, the baking powder, and the salt in a large mixing bowl.  Add the mashed banana, butter, and milk and beat on low speed until everything is blended.  Then, mix for about 2 minutes on high speed.

Add the eggs and the remaining flour, beating until completely blended.  Stir in the nuts by hand.

Pour the batter into a greased loaf pan (about 8x4x2-inche pan) and bake for about 60 minutes.

Remove from the oven when a toothpick inserted near the center comes out clean and cool on a wire rack for about 10 minutes.  Remove from the pan and allow it to finish cooling.

The recipe yields one loaf, about 16 servings.

Cooling Banana Bread

Cooling Banana Bread

Tips and Tricks:

– Do not over mix the batter, as it can affect the moisture and density of the bread.
– If you don’t have any butter or margarine, or don’t have time to wait for it to become room temperature, you can use shortening.
– It is best to grease your loaf pan with butter or shortening.  Non-stick spray never works as well.
– The nuts are optional.  Try walnuts, pecans, or a combination of your favorites.
– Try sprinkling some sugar on the top of the batter right before baking.  This gives the top outer crust a little extra sweetness.
– Serve sliced banana bread with butter or cream cheese.